Top 6 DIY Halloween Treat Bags Decorating Ideas For Preschoolers: Detailed Instruction
Halloween is a fantastic time to craft with children. These Top 6 DIY Halloween Treat Bags Decorating Ideas For Preschoolers from Paylessvouchercodes are the ideal solution if you're throwing a Halloween party or want something adorable and inventive to give trick-or-treaters this year. You can also create one of these bags for your preschoolers to collect your treats if you're going trick-or-treating with the kids.
Halloween Characters Treat Boxes

These Halloween Characters Treat Boxes, which are from it's always autumn, are super easy and cute. You can make these boxes within a few minutes. You need to prepare colored paper, a pair of scissors, glue, and markers. Here is the instruction:
Firstly, use the Silhouette to cut out the design.
Follow by placing the face down and the right flap should be folded up. Add any additional embellishments with glue, and then cover the eyes and mouth with black paper from the back.
After that, apply strong double-sided adhesive to the dot-delineated areas.
And, form into a tube and fasten the flap to the opposite side.
Then, squeeze the bottom shut.
Finally, put treats in the container and pinch the top shut.
Easy DIY Pumpkin Surprise Treat Bags
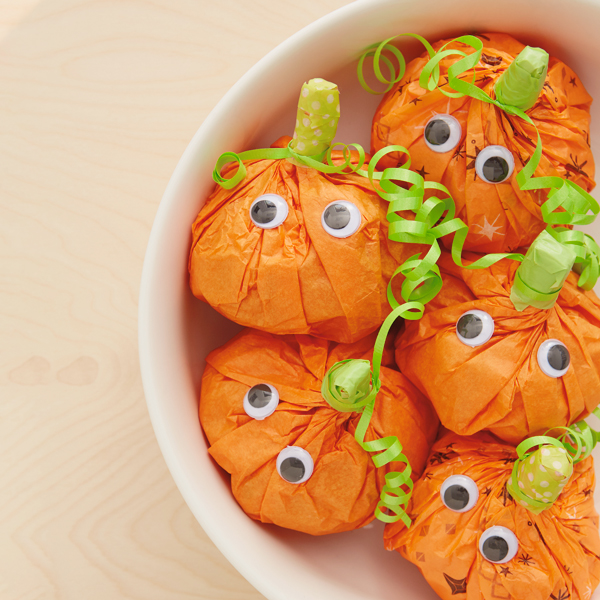
You can create these simple DIY pumpkin surprise treat bags for kids with just a few basic craft supplies:
- Orange tissue paper
- Teal tissue paper
- Plastic wrap or clear cellophane wrap
- Green curling ribbon
- Green washi tape or masking tape and a green permanent marker
- Gift tags
- Googly eyes
- Scissors
Let’s follow the instructions below:
Step1: Cut the plastic wrap and tissue paper into squares. Put the plastic wrap on top of the tissue paper.
Step2: One of your double-layered squares should be covered by a piece of plastic wrap or clear cellophane that has been torn off and is slightly smaller than the tissue paper. This is the lining; it will aid in creating a pleasing pumpkin shape and prevent the candy from penetrating the tissue.
Step3: Place a cup of treats on the plastic wrap. In the center of the squares, form them into a dome-shaped pile.
Step4: For your pumpkin, wrap the treats in plastic and form them into a squishy ball.
To knot the pumpkin surprise treat bag and fix the stem, gently twist the tissue paper at the top. To create a flat stem, cut the tissue paper's top off.
Step5: Use the tape to tighten the top of the stem. Next, tie a piece of curling ribbon at the base of the stem and use your scissors to curl it into cute little pumpkin vines.
Step6: Stick the pumpkin googly eyes to the pumpkin. You also draw some mouths, noses, and so on to make personalized pumpkin treat bags for specific kids.
Golden Gourd Basket
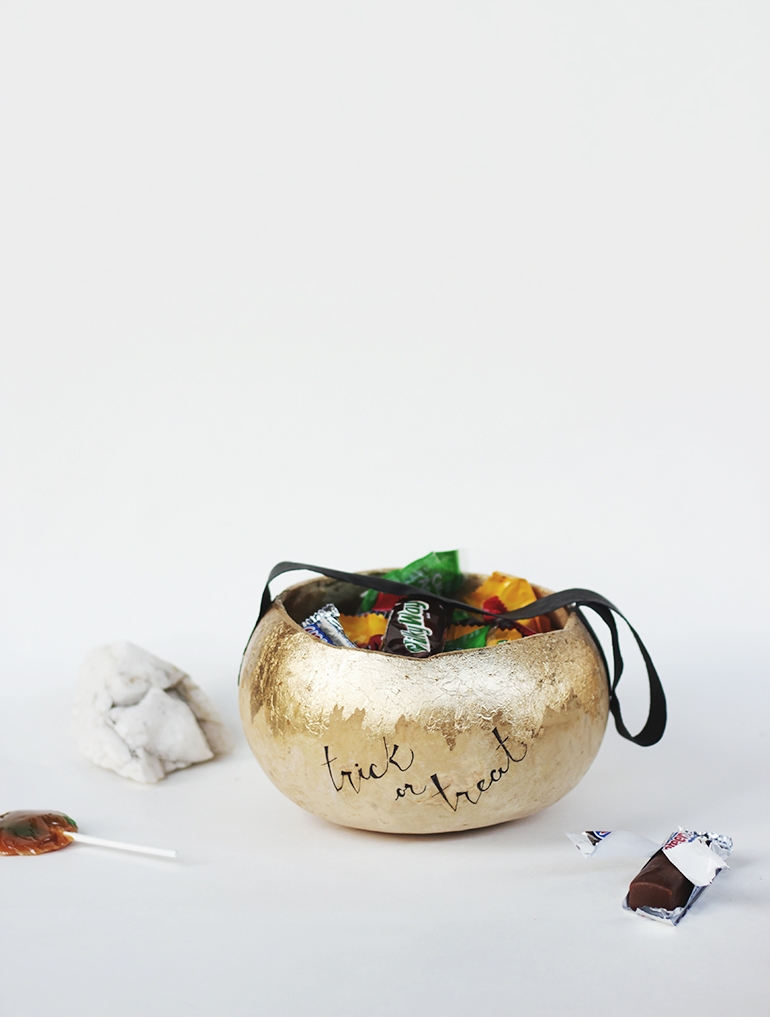
- Dried and already-cut Gourd
- Gold Leaf Kit
- Mod Podge
- A String
- Glue
- Marker
To make a golden gourd basket, let’s follow our detailed instructions:
Step1: To seal the inside of the gourd, coat it with Mod Podge several times.
Step2: Use the gold leaf kit as directed to add gold to the gourd's top.
Step3: Use super glue to attach a string handle of the desired length to the gourd's sides. Totally dry the area.
Step4: Use the marker to decorate the bag, you can write "Trick or treat" or funny faces.
Duct Tape Buckets

We have just the thing for you if you're looking for the ideal trick-or-treat candy bucket but don't want to find that what you're looking for just doesn't exist. DIY cardboard wings and duct tape-adorned treat bucket in the shape of a bat (or pumpkin)! These are the things that you need:
- a tin can with a handle
- an assortment of festive duct tape colors
- an X-acto knife and self-healing mat
- cardboard
How to make:
Step1: Cover the bat in black with black tape. To ensure that no sharp edges are visible, make sure to fold a thick layer of tape over the top of the bucket.
Step2: Stick the orange tape inside the tin. To make it even easier for little hands to hold throughout their night of tricks and treats, you might want to add a few layers of duct tape to the handle's top.
Step3: Cut out a few triangle shapes and tape them to the inside of the bucket. Then, add a few bat ears by taping together pieces of black tape.
Step4: Use colorful papers to cut out the eyes, nose, mouth, and cheeks of the face.
Step5: Download the bat wing template, then duplicate it twice on cardboard to create the bat wings. Cardboard wings should be cut out and covered with duct tape. At the dotted line, fold the wing over, then tape it firmly to your bucket.
Jack-O'-Lanterns Party Favors

Let’s make these super simple Jack-O'-Lanterns within a few minutes now. Funny jack-o-lanterns like these make lovely party favors.
Step1: Cut out the clip art after printing it on card stock.
Step2: Use pinking shears to trim the top edge, then secure it around a small bag of candy corn with invisible tape.
Step3: Using a pencil as a "stem," curl floral wire covered in cloth around it to seal the bag.
Halloween Stuffed Cones Treat Bags

Stuffed Cones Treat Bags is one of the great Halloween candy treat bags you should make for your kids this Halloween. These are the material you need to make the bag:
- white card stock
- 2-1/4" paper punch
- hole punch
- double-sided tape
- ribbon
- scissors
- crinkle filler or tissue paper
How to make:
Step1: Download and print the cone template to print on the card stock. Cone's edges should be cut out with scissors. Cone-shaped roll; tape edges with double-sided tape.
Step2: Print Halloween party circles by downloading them. Cut the page into strips, then punch out patterns with a 2-1/4" circle punch. Apply double-sided tape to the cone's front to secure a circle.
Step3: Stick the ribbon handle to each side of the cone by making two holes. Thread ribbon through holes and knot on each side inside the cone so the knots aren't visible. Tie bows and attach to the outside of the cone, covering the holes made for the handle. Fill the cone with crinkle filler or tissue paper, then top with an assortment of candy, small toys, or Halloween trinkets.
All in all, we hope that this article was informative enough for you and that we were able to provide you with some great starting points for creating your Halloween treat bags.
Browse our website for more fantastic articles related to Halloween. Do not forget to make use of discount codes to shop at better prices.
Read more: The Most Creepy Matching Creepy Couple Halloween Costumes Ideas 2022